Welcome to EstateMate User Guide!
Table of Contents
1. Introduction
1.1 What Is EstateMate
EstateMate is designed for property managers who need an efficient way to track tenant information and manage maintenance jobs.
1.2 User Proficiency and Expectations
- Professional Focus: EstateMate is optimized for property managers who manage multiple tenants and maintenance jobs at once and need a reliable place to keep things organised.
- Efficiency: Built specifically for the property management workflow, EstateMate prioritizes fast, streamlined operations so managers can update tenant information and track maintenance jobs.
- User-Friendly: Whether you are familiar with command-line tools or prefer a simple graphical interface, EstateMate is designed to be intuitive and straightforward, ensuring smooth property management.
1.3 Why This User Guide Matters
This guide is designed to help property managers make the most out of EstateMate's features. Managing tenant contacts and tracking maintenance tasks efficiently is essential for smooth property operations. Inside, you will find step-by-step instructions, examples, and helpful tips to streamline your workflow so that you can keep your properties running smoothly.
2. Quick start
2.1 Installation
Ensure you have Java
17or above installed in your computer (Follow the guide here).
Mac users: Ensure you have the precise JDK version prescribed here.Copy the file to the folder you want to use as the home folder. This is the folder where you would like to keep the
.jarfile for access, and where the app will store its data files.Open your search bar by pressing the Windows key (or the search button for Mac).
Open a command terminal by typing "terminal" in the search bar and press "Enter". The command terminal is an app that is already in your computer.
Use
cd [folder path]to navigate into the folder you put the jar file in, and use thejava -jar estatemate.jarcommand to run the application.
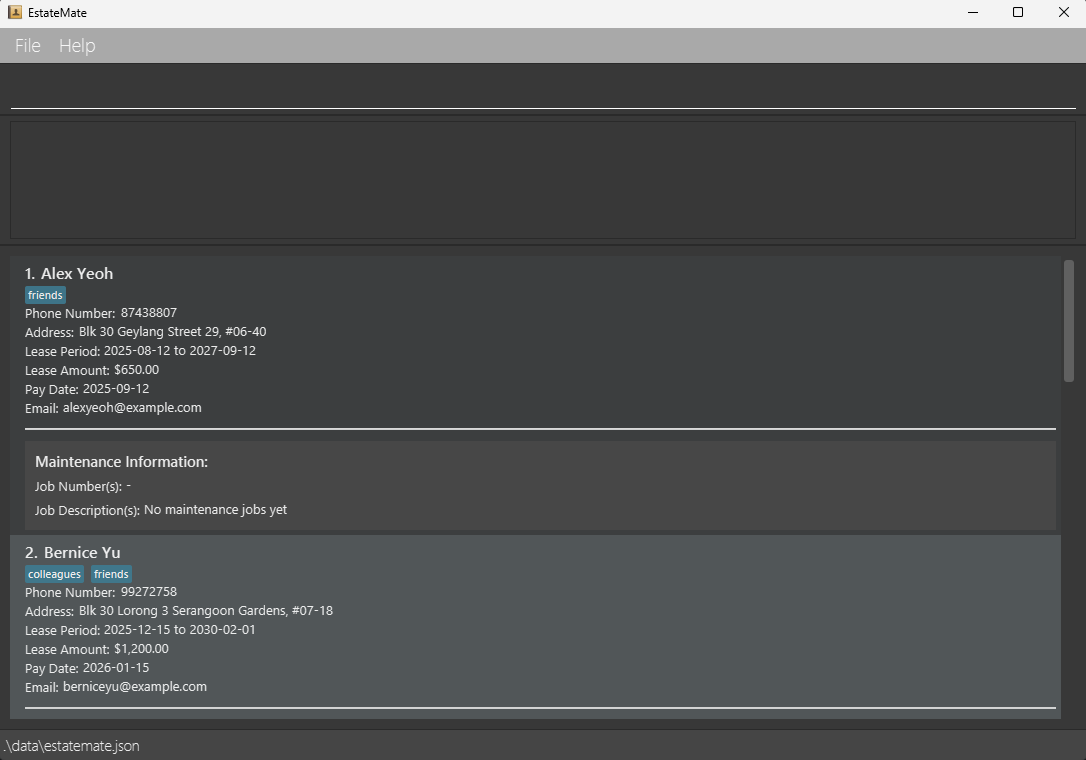
A GUI (Graphical User Interface) similar to the below should appear in a few seconds. Note how the app contains some sample data.
Type a command in the command box and press Enter to execute it. e.g. typing
helpand pressingEnterwill open the help window.
Some example commands you can try:list: Lists all contacts.tenant n/John Tan p/91234567 e/jtan@example.com a/Blk 123 #12-34, Bedok lease/2025-01-01 2026-12-31 r/2800.00 paydate/2025-01-01: Adds a contact namedJohn Tanto the application.delete 3: Deletes the 3rd tenant contact shown in the current list.clear: Deletes all contacts.exit: Exits the application.

- Refer to the Features below for details of each command.
2.2 User Interface Overview
Upon opening the application, you should see the following UI:

To input commands, use the input box at the top of the window. The available commands will be explained below.
2.3 Understanding Command Prefix
In EstateMate, commands use prefixes to identify each parameter.
Each prefix must be followed by a / and its corresponding value.
| Prefix | Meaning | Example Usage |
|---|---|---|
n/ | Tenant name | n/John Tan |
p/ | Phone number | p/91234567 |
e/ | Email address | e/jtan@example.com |
a/ | Address | a/Blk 123 #12-34 |
lease/ | Lease period (start to end date) | lease/2025-01-01 2026-12-31 |
r/ | Rent amount | r/2800.00 |
paydate/ | The next rent payment deadline | paydate/2025-01-01 |
t/ | Tag | t/friend |
j/ | Job number | j/2 |
d/ | Description | d/Broken pipe |
💡Tip:
Combine multiple prefixes in one command:
tenant n/John Tan p/91234567 e/jtan@example.com a/Blk 123 #12-34, Bedok lease/2025-01-01 2026-12-31 r/2800.00 paydate/2025-01-01
3. Features
This section provides a comprehensive overview of the features available in EstateMate.
It is designed to help property managers understand how to efficiently manage tenant information and maintenance jobs
through various commands.
Each feature is grouped by functionality:
- Tenant Management — Commands for adding, deleting, editing, and finding tenant details.
- Maintenance Job Management — Commands for creating, tracking, and updating maintenance jobs, including linking them to tenants.
- General Utilities — Commands for clearing data, exiting the application, and accessing in-app help.
Words in
UPPER_CASEare the parameters to be supplied by the user.
e.g. intenant n/NAME,NAMEis a parameter which can be used astenant n/John Doe.Items in square brackets are optional.
e.g.n/NAME [t/TAG]can be used asn/John Doe t/friendor asn/John Doe.Items with
… after them can be used multiple times including zero times.
e.g.[t/TAG]…can be used ast/friend, ort/friend t/familyetc.Parameters can be in any order.
e.g. if the command specifiesn/NAME p/PHONE_NUMBER,p/PHONE_NUMBER n/NAMEis also acceptable.Extraneous parameters for commands that do not take in parameters (such as
help,list,exitandclear) will be ignored.
e.g. if the command specifieshelp 123, it will be interpreted ashelp.If you are using a PDF version of this document, be careful when copying and pasting commands that span multiple lines as space characters surrounding line-breaks may be omitted when copied over to the application.
3.1 Tenant Management
3.1.1 Adding a Tenant: tenant
Adds a tenant to the application.
Format: tenant n/NAME p/PHONE e/EMAIL a/ADDRESS lease/START END r/AMOUNT paydate/PAYDATE [t/TAG]…
📌Note:
- A tenant can have any number of tags, including zero.
- Tags help you label tenants with additional info (for example:
t/friendly,t/overdue,t/contractor,t/vip). - Tags are purely descriptive in the current version, commands like
finddo not look at tags.- If you don't want to add any tags, do not type "t/" at all.
- Address can only take up to 170 characters including spaces, symbols and punctuations.
lease/START ENDrefers to the lease period, specified as two valid calendar dates in the formatyyyy-MM-dd yyyy-MM-dd, separated by exactly one space. The first date is the start date and the second date is the end date. The end date must be on the same day or after the start date.- Pay date is used to record the tenant's next rent payment deadline. You must enter a valid calendar date with the format
yyyy-MM-dd.
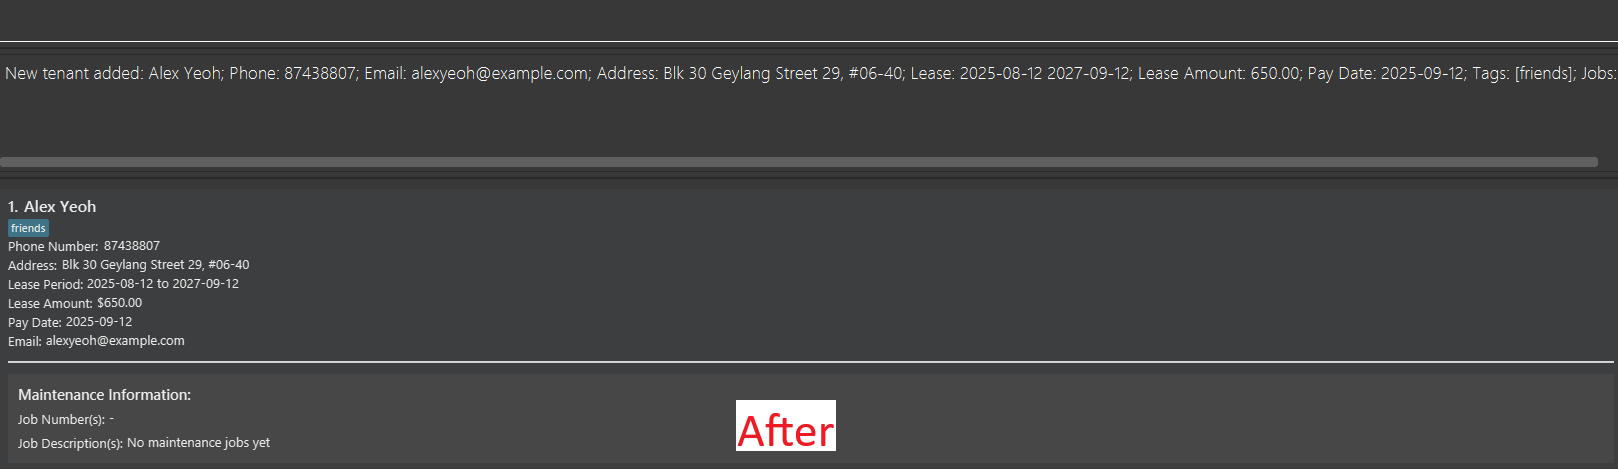
- As seen in the "After" picture, there is an empty "Jobs:" field in the success message, indicating that the tenant was created without jobs assigned to them yet.
Examples:
tenant n/John Tan p/91234567 e/jtan@example.com a/Blk 123 #12-34, Bedok lease/2025-01-01 2026-12-31 r/2800.00 paydate/2025-01-01tenant n/Sarah Kim p/12398653 e/sarahk@example.com a/Blk 234 #56-78, Clementi lease/2025-02-02 2027-02-02 r/4000.00 paydate/2025-02-02
❗ Warning:
- For addresses that begin with the part
a/, ensure that there is no space between the prefix and the address, for the input to be considered valid.- e.g.
a/a/Clementi Avenue 1will be considered acceptable input, whilea/ a/Clementi Avenue 1will not.
- e.g.
💡Tip:
- The pay date is managed manually, giving you the flexibility to adjust the payment schedule as needed. Use edit to update your tenant's pay date.
- You can set the pay date to be outside the lease period if you need to track pre-payments, post-payments or other irregular rent arrangements.
3.1.2 Deleting a Tenant: delete
Deletes the specified tenant from the application.
Format: delete TENANT_NUMBER
📌Note:
TENANT_NUMBERis the index displayed next to each tenant in the tenant list, and must be a positive number between 1 and 2147483647.- Only tenants that exist in the latest displayed tenant list (most recent use of
listorfindcommands) can be deleted.
❗ Warning:
- This action is irreversible, data will be permanently deleted.
- Once a tenant is deleted, any links to jobs associated with that tenant will also be removed.
Examples:
listfollowed bydelete 2deletes the 2nd tenant listed in the application.find Johnfollowed bydelete 1deletes the 1st tenant in the results of thefindcommand.
💡Tip:
- Use
listorfindfirst to confirm the correct tenant before deleting to avoid accidental removal. - If you are deleting multiple tenants, consider double-checking indices after each deletion, as the list order updates dynamically.
3.1.3 Editing a Tenant: edit
Edits an existing tenant in the application.
Format: edit TENANT_NUMBER [n/NAME] [p/PHONE] [e/EMAIL] [a/ADDRESS] [lease/START END] [r/AMOUNT] [paydate/PAYDATE] [t/TAG]…
📌Note:
TENANT_NUMBERis the index displayed next to each tenant in the tenant list, and must be a positive number between 1 and 2147483647.- Provide at least one parameter to edit.
- Tags are replaced, not merged. If you run
edit 2 t/friendly t/overdue, the tenant will end up with only those two tags regardless of how many tags they had before. - You can remove all the person’s tags by typing
t/without specifying any tags after it.
Examples:
edit 1 p/91234567 e/johndoe@example.comedits the phone number and email address of the 1st tenant to be91234567andjohndoe@example.comrespectively.edit 2 n/Betsy Crower t/edits the name of the 2nd tenant to beBetsy Crowerand clears all existing tags.
💡Tip:
- Use
listorfindfirst to confirm the correct tenant before editing to avoid overwriting important data. - When updating multiple parameters, include all changes in a single command to reduce errors.
- Use
editwhenever you need to update a tenant's pay date to reflect a new rent payment deadline.
3.1.4 Finding a Tenant: find
Finds tenants whose names contain any of the given keywords.
Format: find KEYWORD [MORE_KEYWORDS]
📌Note:
- The search is case-insensitive. e.g
hanswill matchHans. - The order of the keywords does not matter. e.g.
Hans Bowill matchBo Hans. - Only the names of tenants are searched.
- Only full words will be matched e.g.
Hanwill not matchHans. - Tenants matching at least one keyword will be returned.
e.g.
Hans Bowill returnHans Gruber,Bo Yang
Examples:
find JohnreturnsjohnandJohn Doe.find alex davidreturnsAlex Yeoh,David Li.
💡Tip:
- Use specific keywords to narrow results, especially for common names.
- Combine multiple keywords when you want to search for multiple tenants at once.
3.1.5 Listing All Tenants: list
Displays a list of all tenants currently stored in the application, ordered from the earliest added to the most recent.
Format: list
📌Note:
- Any additional input after
listcommand will be ignored. listwithout any tenants will show you an empty list, hence you are recommended to add some tenants to the application before using this command.
3.2 Maintenance Job Management
3.2.1 Adding a Job: job
Adds a maintenance job to the application.
Format: job d/DESCRIPTION
📌Note:
- Provide a clear and concise description of the maintenance issue.
- Jobs can later be linked to tenants for easy tracking.
- Adding multiple jobs with the same description is allowed. This is useful when different units report similar issues.
- Repeated use of the
d/prefix will take the last use for the job description.- e.g.
job d/Water leakage d/Pipe leakagewill create one job with descriptionPipe leakage.
- e.g.
Examples:
job d/Water leakage in ceilingjob d/Pipe leakage
💡Tip:
- Use consistent wording for similar issues (e.g., "Pipe leakage" vs "Leaking pipe") to make finding the job easier later on.
- Add jobs as soon as issues are reported to keep tenant records up-to-date.
- Create a new job of the same description if there are separate instances of the same problem (e.g. different leaking pipes in separate units).
3.2.2 Deleting a Job: djob
Deletes a maintenance job from the application.
Format: djob JOB_NUMBER
📌Note:
JOB_NUMBERis the index displayed next to each job in the job list, and must be a positive number between 1 and 2147483647.JOB_NUMBERis a unique number tied to each job, and will not be affected by the use ofljobandfjob, unlike theTENANT_NUMBERof thedeletecommand.- Deleting a job removes it from all tenants’ assigned job lists.
❗ Warning:
- This action is irreversible, the job will be permanently deleted.
- Once a job is deleted, any links to tenants associated with that job will also be removed, and it will no longer appear in the tenant’s job list.
Examples:
djob 2deletes the job with job number 2 if it exists.
💡Tip:
- Use
ljobto double-check the job number before deleting to avoid removing the wrong job. - If you may need a record of the job later, consider marking it as completed instead of deleting it.
3.2.3 Editing a Job: ejob
Edits a maintenance job in the application.
Format: ejob JOB_NUMBER d/DESCRIPTION
📌Note:
JOB_NUMBERis the index displayed next to each job in the job list, and must be a positive number between 1 and 2147483647.- Only jobs that exist in the current displayed list can be edited.
- Provide a clear and concise description of the maintenance issue.
- Editing a job to match the description of another job is allowed. This is useful when different units report similar issues.
- Repeated use of the
d/prefix will take the last use to edit the job description.- e.g.
ejob 1 d/Water leakage d/Pipe leakagewill edit the description of job 1 toPipe leakage.
- e.g.
Examples:
ejob 3 d/fix faucetchanges the description of the job with job number 3 to "fix faucet".
💡Tip:
- Use descriptive keywords in the description to make finding the job easier later on.
- You can quickly edit a job after using
ljobto confirm the job number.
3.2.4 Finding a Job: fjob
Finds maintenance jobs whose descriptions contain any of the given keywords.
Format: fjob KEYWORD [MORE KEYWORDS]
📌Note:
- The search is case-insensitive. e.g
pipewill matchPipe. - The order of the keywords does not matter. e.g.
Pipe leakwill matchleak pipe. - Only the description is searched.
- Only full words will be matched e.g.
Pipewill not matchPipes. - Maintenance jobs matching at least one keyword will be returned.
e.g.
Broken windowwill returnBroken pipe,Window repair
Examples:
fjob pipereturnspipeandPipe Leakage.fjob aircon repairreturnsAircon LeakageandRepair Pipe.
💡Tip:
- Use specific keywords related to the job description to narrow down results, e.g.,
pipe leakageinstead of justpipe. - Combine multiple keywords for broader search if you’re unsure of the exact description, e.g.,
aircon repair ceiling.
3.2.5 Linking Job to Tenant: link
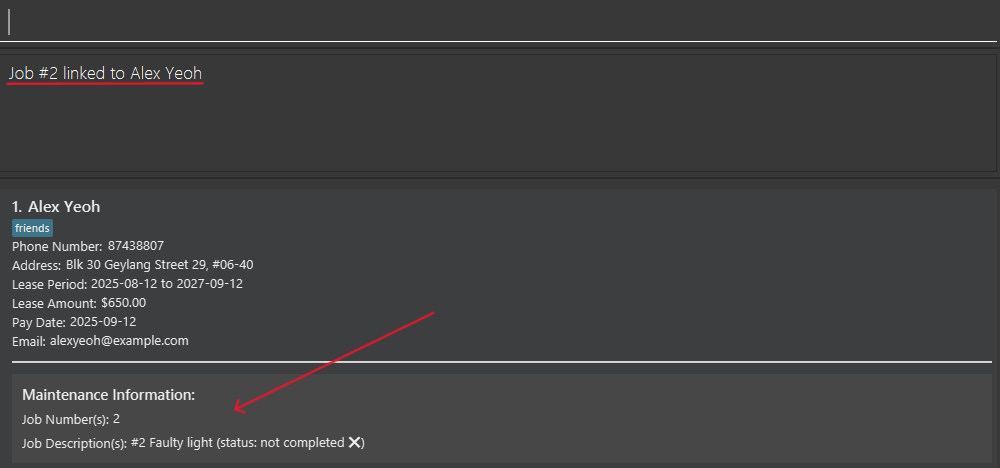
Links a maintenance job to a specific tenant so that the job can be tracked alongside its relevant tenants.
Format: link TENANT_NUMBER j/JOB_NUMBER
📌Note:
JOB_NUMBERis the index displayed next to each job in the job list.- You can only link jobs and tenants that already exist in the system.
- Once linked, the job will appear under the tenant’s assigned jobs in the display.
- Deleting a linked job will also remove it from all tenants' assigned job lists.
- Marking and unmarking a linked job will change the completion status under the tenant’s assigned job list.
- The same job can be linked to multiple tenants.
- Repeated use of the
j/prefix will take the last use as the job to link to the tenant.- e.g.
link 1 j/1 j/3will link only job 3 to the first tenant in the list.
- e.g.
Examples:
link 1 j/2links the 2nd maintenance job in the job list to the 1st tenant in the tenant list.
💡Tip:
- Link jobs as soon as they are created to keep tenants’ maintenance records accurate and avoid losing track of pending tasks.
- Link the same job to multiple tenants only if they all face the same shared issue (e.g. The same pest infestation affects multiple units). When you
markorunmarkthe job, the status will be reflected for all linked tenants. - Link different jobs to different tenants if they are separate issues (e.g. Unrelated pest infestations in different buildings).
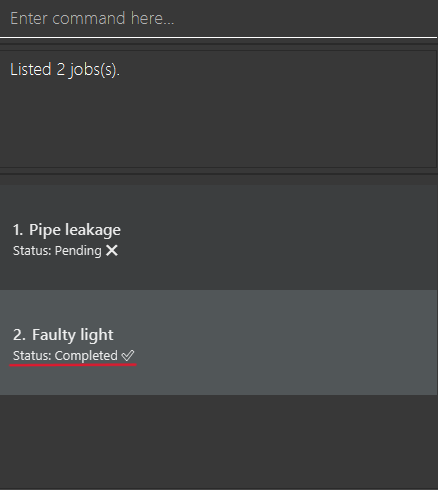
3.2.6 Listing All Jobs: ljob
Displays a list of all jobs currently stored in the application, ordered from the earliest added to the most recent.
Format: ljob
📌Note:
- Any additional input after
ljobcommand will be ignored. - Running the
ljobcommand without any jobs stored in the application will show you an empty list, hence you are recommended to add some maintenance jobs before using this command.
3.2.7 Marking Job as Completed: mark
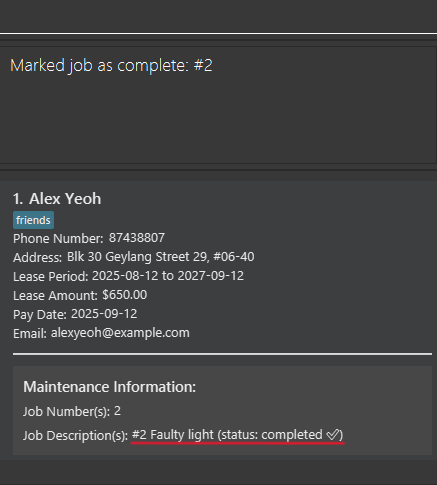
Updates the status of a maintenance job to Completed so that you can track completed maintenance jobs easily.
Format: mark JOB_NUMBER
📌Note:
JOB_NUMBERis the index displayed next to each job in the job list, and must be a positive number between 1 and 2147483647.- Once marked, the job status will be updated in the display under any linked tenant.
- If a job is marked by mistake, you can use the
unmarkcommand to revert it toNot Completed. markwill complete the job for all tenants linked to the job.- You can even mark a job not currently linked to any tenant, for cases where a job for cases where a job is related to an unoccupied unit.
Examples:
mark 2updates the completion status of job number 2 of the job list to 'completed'.
💡Tip:
- Use
ljobto double-check the job list before usingmarkto ensure you’re updating the correct job. - Use
unmarkto revert mistakes if a job is accidentally marked as completed.
3.2.8 Marking Job as Not Completed: unmark
Reverts a maintenance job's status to Not Completed in case it was marked as complete by mistake.
Format: unmark JOB_NUMBER
📌Note:
JOB_NUMBERis the index displayed next to each job in the job list, and must be a positive number between 1 and 2147483647.- Once unmarked, the job will no longer appear as completed.
unmarkwill mark the job as not complete for all tenants linked to the job.- You can even mark a job not currently linked to any tenant as not complete, for cases where a job related to an unoccupied unit.
Examples:
unmark 3updates the status of job number 3 in the job list back to not completed.
💡Tip:
- Use
ljobto double-check the job list before usingunmarkto ensure you’re updating the correct job. - Use
markto revert mistakes if you accidentallyunmarka job.
3.3 General Utilities
3.3.1 Clearing All Tenants: clear
Removes ALL tenants and maintenance jobs from the application.
Format: clear
❗ Warning:
This action is irreversible, all data will be permanently deleted. Make sure you have backed up any important tenant or job information before using this command.
💡Tip: Use clear only when you want to start fresh or reset your tenant list.
3.3.2 Exiting Application: exit
Closes the program.
Format: exit
📌Note: All data entered will be automatically saved to storage.
3.3.3 Getting Help: help
Opens the help window which provides a link for accessing the user guide to get assistance with commands. This command is useful if you need a quick reminder on how to use the available commands.
Format: help
4. Command Summary
| Action | Format | Examples |
|---|---|---|
| Add Tenant | tenant n/NAME p/PHONE e/EMAIL a/ADDRESS lease/START END r/AMOUNT paydate/PAYDATE | tenant n/John Tan p/91234567 e/jtan@example.com a/Blk 123 #12-34, Bedok lease/2025-01-01 2026-12-31 r/2800.00 paydate/2025-01-01 |
| Add Job | job d/DESCRIPTION | job d/Water leakage in ceiling |
| Clear | clear | |
| Delete Tenant | delete TENANT_NUMBER | delete 3 |
| Delete Job | djob JOB_NUMBER | djob 3 |
| Edit Tenant | edit TENANT_NUMBER [n/NAME] [p/PHONE] [e/EMAIL] [a/ADDRESS] [lease/LEASE] [r/AMOUNT] [paydate/PAYDATE] [t/TAG]… | edit 2 n/James Lee p/23847674 e/jameslee@example.com a/Kent Ridge, Blk #520 lease/2025-01-01 2026-12-31 r/1234.56 paydate/2025-02-01 t/friend |
| Edit Job | ejob JOB_NUMBER d/DESCRIPTION | ejob 3 d/fix faucet |
| Exit | exit | |
| Find Tenant | find KEYWORD [MORE_KEYWORDS] | find James Jake |
| Find Job | fjob KEYWORD [MORE_KEYWORDS] | fjob electrical plumbing renovation |
| Help | help | |
| Link Job to Tenant | link TENANT_NUMBER j/JOB_NUMBER | link 1 j/2 |
| List Tenants | list | |
| List Jobs | ljob | |
| Mark Job | mark JOB_NUMBER | mark 1 |
| Unmark Job | unmark JOB_NUMBER | unmark 1 |
5. FAQ and Known Issues
5.1 FAQ
Q: How do I transfer my data to another computer?
A:
- Install EstateMate on your other computer.
- On your original computer, navigate to the home folder. This is the folder where the EstateMate app
estatemate.jaris stored. - You should see a folder named
data. Copy this folder into your other computer. - In your other computer, navigate to the home folder. Find the folder named
dataand delete it. Replace it with the folder you copied over from your original computer.
5.2 Known issues
- When using multiple screens, if you move the application to a secondary screen, and later switch to using only the primary screen, the EstateMate app will open off-screen. The remedy is to navigate to the home folder, find the file named
preferences.jsonand delete it before running the application again. - If you minimize the Help Window and then run the
helpcommand (or use theHelpmenu, or the keyboard shortcutF1) again, the original Help Window will remain minimized, and no new Help Window will appear. The remedy is to manually restore the minimized Help Window.